Address
Australia, Singapore, and USA
Address
Australia, Singapore, and USA

Learn how to perform a file transfer pc to mac with our expert tips. Discover network sharing, external drives, cloud sync, and Migration Assistant today!
So you’ve got a brand-new Mac, and the only thing standing between you and that fresh-out-of-the-box feeling is a mountain of files on your old PC. The thought of a file transfer from PC to Mac can feel like a huge chore, but it doesn’t have to be.
The secret isn’t finding one “perfect” method, but picking the right tool for your specific situation. We’ll walk you through four solid techniques: using an external drive, sharing over your network, syncing with cloud storage, and letting Apple’s Migration Assistant do the heavy lifting.
Moving your digital life from a Windows PC to a sleek new Mac should be exciting, not stressful. The key is knowing which transfer method fits your needs. Are you doing a one-time move of a massive photo library, or do you need to keep accessing documents on both machines for a while? Each scenario calls for a different approach.
This guide gives you a practical look at the most common techniques. Instead of just a dry list of steps, we’ll get into the real-world application of each one so you can make the right choice from the start.
To get a sense of what works for most people, it helps to see which methods are the most popular. This chart breaks down the top three ways people move files from a PC to a Mac.
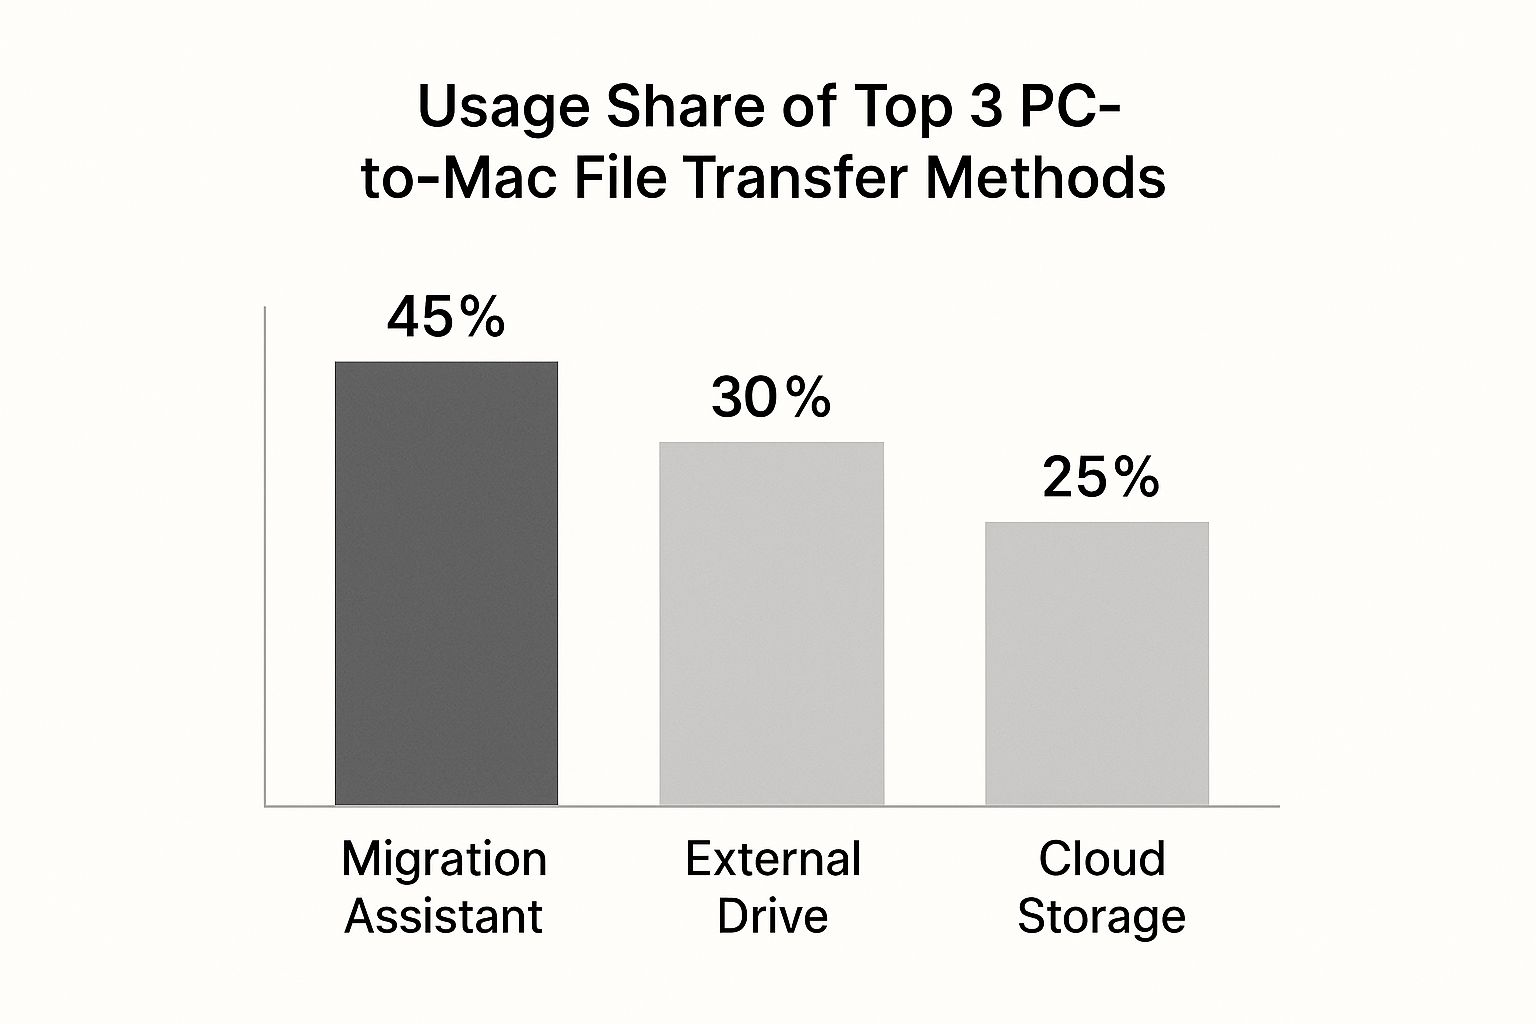
As the data clearly shows, Apple’s Migration Assistant is the crowd favorite, and for good reason—it’s built specifically for users making a complete switch.
It’s the go-to choice because it automates the entire process of moving your files, user accounts, and even some settings. If you connect your computers with a cable, it can often get the whole job done in under an hour. It’s no surprise it’s the leading option for new Mac users.
The most common mistake people make is picking a tool that doesn’t match the job. A quick, one-time transfer of a few gigabytes is a totally different ballgame than migrating an entire user profile with years of data.
To help you decide, here’s a quick comparison of the methods we’ll be covering.
This table breaks down the four main transfer methods, giving you a quick look at their best use cases, speed, and overall ease of use.
| Method | Best For | Typical Speed | Ease of Use |
|---|---|---|---|
| Migration Assistant | A complete, one-time move to a new Mac | Very Fast (wired) | Easy |
| External Drive | Large, one-off transfers or creating backups | Fast | Easy |
| Network Sharing | Ongoing access to files on both machines | Moderate to Fast | Moderate |
| Cloud Storage | Syncing a small set of files across devices | Slow to Moderate | Very Easy |
Each has its strengths, and the right one for you depends entirely on what you’re trying to accomplish.
Of course, dedicated tools can also play a role. When looking for alternatives, you might come across platforms that have been recognized as powerful recognized file sharing software, which can offer another great option for your toolkit.

When you’re facing a massive, one-time file transfer from PC to Mac, sometimes the old-school methods are still the best. The humble external drive remains one of the most reliable tools in the box, especially when your internet connection isn’t up to the task. It’s straightforward and perfect for moving huge collections like your entire photo library or years of documents.
The most critical step, however, happens before you even think about copying a single file: getting the drive format right. This is a classic snag. Windows PCs love to format drives using NTFS, a file system that a Mac can read but, crucially, cannot write to. To sidestep this roadblock, you need a format that both operating systems can play nice with.
This is where exFAT comes in. Think of it as the universal translator for drives that need to shuttle between the Windows and macOS worlds.
First things first, check that your external drive has enough space. It’s also a smart move to back up any data already on the drive, because formatting will wipe it completely clean.
On your Windows PC, plug in the drive. Open File Explorer, right-click the drive, and select “Format.” In the “File system” dropdown menu, choose exFAT, give the drive a memorable name, and kick off the format process.
With a freshly formatted drive, you’re ready to start moving your data.
C:\Users\[YourUsername].Pro Tip: Resist the urge to copy your entire user folder. You’ll just bring along a lot of system files and other junk you don’t need. A selective copy of your personal data results in a much cleaner, more organized transfer.
Once everything is copied over, be sure to safely eject the drive from your PC.
Now, plug the exFAT-formatted drive into your Mac. It should pop up on your desktop or in a Finder window’s sidebar. Open it up, and you’ll see the organized folders you just copied from your PC.
From here, it’s a simple drag-and-drop. Move the contents from the “Documents” folder on the drive into your Mac’s “Documents” folder, and do the same for Pictures, Music, and the rest. If you’re dealing with truly massive file collections, you might want to learn more about how to transfer large files to make the process as smooth as possible. After everything is safely on your Mac, you can eject the drive.
When you need constant access to files between your PC and Mac, or you just want to move things around wirelessly without any extra gear, setting up a local network share is a fantastic way to go. This method basically turns a folder on your Windows PC into a shared drive that your Mac can see and use over your Wi-Fi or Ethernet. It’s the perfect setup for a file transfer pc to mac scenario involving shared project files, work documents, or a central family photo library.
The whole process kicks off on your Windows machine. You’ll pick a specific folder to share, which gives you complete control over what your Mac can access. Just right-click the folder you want to use, head to “Properties,” and click on the “Sharing” tab.
From there, you’ll want to jump into the “Advanced Sharing” options to officially enable sharing. This is also where you’ll handle the most important step: setting permissions. This ensures you know exactly who can see and modify your files.
Getting the permissions right is crucial for keeping your data safe. You can give your Mac read-only access (so it can see but not change files) or grant full read/write privileges if you need to edit files directly on the share. For a deeper dive into this, our guide on how to share files securely offers some great insights into protecting your data during transfers.
Once your Windows folder is shared and ready, hop over to your Mac. Open a new Finder window, click the “Go” menu at the top of your screen, and choose “Connect to Server.” This is where you’ll point your Mac to the shared folder on your network.
In the server address box that pops up, type smb:// followed by your PC’s computer name. Click “Connect,” and your Mac will ask for the username and password for your Windows account. Punch in your credentials, and boom—the shared folder will appear right in your Finder, ready for you to drag and drop files.
A wired Ethernet connection is a total game-changer for this. While Wi-Fi works just fine, plugging both your PC and Mac directly into your router with Ethernet cables will give you a much faster and more stable connection. This can dramatically cut down transfer times for big files.
This kind of cross-platform sharing has gotten so much smoother thanks to the broad adoption of the SMB (Server Message Block) protocol. Today, both macOS and Windows are built to talk to each other using this standard, which really streamlines the whole process and makes network sharing more user-friendly than it’s ever been.

If you’re looking for a modern way to handle your file transfer from PC to Mac, cloud services like Dropbox, Google Drive, or OneDrive are a fantastic solution. This isn’t just about a one-time data dump; it’s about creating a living, synchronized bridge between your two computers.
This method is perfect if you plan on using both your PC and Mac regularly. It ensures you always have access to the most up-to-date versions of your files, no matter which machine you’re on.
The setup is surprisingly simple. First, you’ll install the desktop app for your chosen service on your Windows PC. Once you’re signed in, just drag your important documents, photos, and project folders into the dedicated cloud folder. The app handles the rest, uploading everything to the cloud.
Next, do the same thing on your new Mac: install the app and sign in with the same account. Almost like magic, all the files you just uploaded from your PC will start to appear and download automatically. Your files are now synced, and any change you make on one machine will show up on the other almost instantly.
The benefits here are huge. You get anywhere-access to your files from any device, and it doubles as a built-in backup. I’ve found that organizing my files this way helps cut down on digital clutter and makes me more productive. For a deeper dive into the advantages, you can explore the world of personal cloud storage and see how it’s changing modern workflows.
But there are a couple of trade-offs. This method lives and dies by your internet connection speed, especially for that first big upload. Also, while most services have free starter plans, you’ll probably need a paid subscription if you have a lot of data to store.
When you’re looking at cloud options, it’s a good idea to compare different platforms to see what fits your needs best. Checking out various cloud file sharing tools like Google Drive and Wetransfer can highlight key differences in features, security, and price that could help you make your final choice.
When you’re not just moving a few files but switching your entire setup from PC to Mac, Apple’s Migration Assistant is your best friend. It’s built for exactly this scenario: a file transfer from PC to Mac that goes beyond just documents and photos.
This tool is designed to bring over your user accounts, web bookmarks, contacts, and even system settings. The goal is to make your new Mac feel familiar right from the start, saving you from the tedious job of setting everything up from scratch.
For the most reliable transfer, I always tell people to use a hardwired connection. While you can do it over Wi-Fi, connecting both computers with an Ethernet cable is much faster and more stable. You might need a simple USB-C or Thunderbolt to Ethernet adapter for your Mac, but it’s a small price to pay to avoid a transfer that stalls halfway through—a real headache when you’re moving years of data.
Before you kick things off, a little prep work goes a long way. Make sure both your PC and your new Mac are running their latest operating system updates. This is non-negotiable for compatibility.
Next, you’ll need to head over to Apple’s website and download the correct version of the Windows Migration Assistant on your PC. It’s critical that the version you install matches the macOS version running on your Mac.
I also recommend temporarily disabling any antivirus or firewall software on your PC. These security tools are notorious for interfering with the connection and can cause the migration to fail unexpectedly. If you run into any trouble, it’s also a good idea to check Apple’s system status page to make sure their services aren’t down.
Seeing all green lights here is a good sign, confirming that the issue probably isn’t on Apple’s end.
Once you launch the assistant on both machines and they find each other, you’ll see a security code. After you confirm it, your Mac will scan the PC and let you choose exactly what you want to bring over. You can select entire user accounts, applications, settings, and other files. Just be patient; this initial scan can take a little while.
Even if you use a direct tool like Migration Assistant, understanding how different services handle large amounts of data can be helpful. Our detailed cloud storage comparison provides useful context on large-scale data management. Ultimately, Migration Assistant’s real power is in its ability to essentially clone your PC’s user environment onto your Mac, saving you countless hours of manual setup.

When taking a solution like a file transfer service to a global audience, a one-size-fits-all approach to SEO falls short. A robust international keyword strategy is essential. It’s not enough to simply translate your content; you must create localized content that resonates with cultural nuances and regional search habits. This is where geo-targeted landing pages become critical, allowing you to tailor your message and offerings to specific markets.
For example, while a US audience searching for “file transfer pc to mac” might prioritize speed and ease of use, a user in a different region might be more concerned with data privacy or cost. Technical SEO for international reach also plays a huge part, involving elements like implementing hreflang tags to signal the correct language version of a page to search engines.
Different content types drive global conversions more effectively in certain regions. While long-form blog posts might work in one market, another might respond better to video tutorials or infographics. Conversion optimization per region means analyzing user behavior and A/B testing elements like calls-to-action, pricing displays, and social proof to find what works best locally.
A successful global strategy relies on more than just on-page tactics. Backlink building in target regions is crucial for establishing authority. Earning links from respected local tech sites or influencers sends strong signals to search engines that your content is a valuable resource for that specific market.
Ultimately, a winning international strategy combines technical precision with a deep understanding of local cultures. It’s about showing users that you not only speak their language but also understand their specific needs and priorities, which is the key to building trust and driving growth across borders.
Even with a perfect plan, a few nagging questions always seem to surface during a file transfer from PC to Mac. I’ve been through this process countless times, so here are some quick answers to the hurdles people hit most often.
For pure, unadulterated speed, especially with massive files like video projects or photo libraries, nothing beats an external SSD formatted as exFAT. It’s a direct, physical connection that moves data incredibly fast.
Your next-best option is a direct connection using an Ethernet cable. You can either let Apple’s Migration Assistant handle the heavy lifting or set up manual network sharing between the two machines.
Unfortunately, no. This is a common stumbling block. Windows programs (the ones ending in .exe) and macOS applications are built on completely different foundations and can’t run on each other’s operating systems.
You’ll have to find the Mac version for each piece of software you rely on, download it, and install it fresh on your new machine.
When an external drive refuses to cooperate, the culprit is almost always the file format. If the drive was primarily used with a Windows PC, it’s likely formatted as NTFS. While Macs can read files from an NTFS drive, they can’t write to it without special software.
The universal solution is to reformat the drive to exFAT. This format works seamlessly for both reading and writing on Windows and macOS, making it the perfect middleman for your transfer. Just be sure to back up its contents first, as reformatting will erase everything on the drive.
Protecting your data is non-negotiable, no matter which method you choose. For a deeper dive into keeping your files protected from prying eyes, our guide on secure file sharing walks you through the essential practices to keep your data locked down.
For fast, reliable, and secure file management across all your devices, trust Sky Drive Folder. Upload, sync, and share your files effortlessly with advanced encryption and up to 5TB of storage. Get started today at https://skydrivefolder.com.